Blog Link: Click Here

Introduction
VirtualBox is a powerful open-source virtualization software developed by Oracle. It allows users to run multiple operating systems simultaneously on a single machine. Installing VirtualBox on Ubuntu enables users to experiment with different operating systems, test software, and develop applications in isolated virtual environments.
In this article, you will learn how to install VirtualBox on Ubuntu using three different methods.
!https://phoenixnap.com/kb/wp-content/uploads/2024/03/how-to-install-virtualbox-on-ubuntu.png
Prerequisites
- Ubuntu system (this tutorial uses version 22.04).
- A user account with sudo privileges.
- Access to the terminal.
Option 1: Install VirtualBox from Ubuntu Repositories
One way to install VirtualBox is to use the official Ubuntu repositories. The process is straightforward and performed using the package manager (apt).
To install VirtualBox, follow the steps in the sections below.
Step 1: Install VirtualBox
Before installation, update the package repository with:
sudo apt updateNext, download and install VirtualBox by running:
sudo apt install virtualbox
Note: To select a specific VirtualBox version, run sudo apt install virtualbox and hit Tab to see the various VirtualBox versions available for installation.
Step 2: Install the VirtualBox Extension Pack.
The Extension Pack provides additional features and support for USB 2.0 and USB 3.0 devices, VirtualBox Remote Desktop Protocol (VRDP) support, Disk encryption, Intel PXE boot ROM, etc.
To install the VirtualBox Extension Pack, take the following steps:
- Run the command:
sudo apt install virtualbox-ext-pack
- Read the VirtualBox Extension Pack Personal Use and Evaluation License (PUEL) and select <Ok> to confirm.
- Accept the VirtualBox PUEL license terms by selecting <Yes> and hitting Enter.
Once the installation is completed, VirtualBox is ready to run. Start it by executing:
virtualbox
The command has no output but starts VirtualBox.
Option 2: Installing VirtualBox from Oracle's Repositories
Often, the default repositories do not have the latest software versions. For example, run the following command to see the latest VirtualBox version installed via the Ubuntu repository:
VBoxManage --version
The installed version is 6.1.50, while the latest version on the VirtualBox website is 7.0.14.
The older version may work for test environments, but some users need the latest security or functionality patches. The solution is to install VirtualBox from Oracle Repositories. This process is more in-depth but installs the most recent VirtualBox version on Ubuntu.
Step 1: Install Supporting Software
The software-properties-common package is required to run Virtualbox on Ubuntu. It allows users to add new software repositories.
Enter the following command to install the package:
sudo apt install software-properties-common
Step 2: Install GPG Key
Adding GPG keys to the system ensures the integrity and authenticity of the packages you install, especially from third-party repositories like the VirtualBox repository.
To download and install GPG keys, enter:
wget -q <https://www.virtualbox.org/download/oracle_vbox_2016.asc> -O- | sudo apt-key add -
!https://phoenixnap.com/kb/wp-content/uploads/2024/03/install-gpg-key-terminal-output.png
Note: Refer to our guide How to Delete GPG Keys to learn how to delete GPG keys using different methods.
Step 3: Add VirtualBox Repository to Ubuntu
To add the VirtualBox repository, enter the command :
echo "deb [arch=amd64] <https://download.virtualbox.org/virtualbox/debian> $(lsb_release -cs) contrib" | sudo tee /etc/apt/sources.list.d/virtualbox.list
The command creates a repository entry for VirtualBox in Ubuntu's package manager configuration file, specifying the appropriate URL and Ubuntu release codename. It then writes this entry to a file named virtualbox.list in the /etc/apt/sources.list.d/ directory. Then, the system can fetch and install VirtualBox packages from the added repository.
The output deb [arch=amd64] <https://download.virtualbox.org/virtualbox/debian> jammy contrib indicates the command successfully wrote the VirtualBox repository entry to the specified file.
Step 4: Install the Latest Version of VirtualBox
Before installation, update the package lists:
sudo apt update
!https://phoenixnap.com/kb/wp-content/uploads/2024/03/terminal-output-for-sudo-apt-update.png
- Use the following syntax to install VirtualBox on Ubuntu:
sudo apt install virtualbox-[version-number]
At the time of writing this article, the latest VirtualBox version is 7.0.14. Therefore, to install it, run:
sudo apt install virtualbox-7.0
The command installs the version of VirtualBox currently available in the added repository.
Step 5: Install VirtualBox Extension Pack
The VirtualBox Extension Pack enhances the virtual machines' functionality. Install it by taking the following steps:
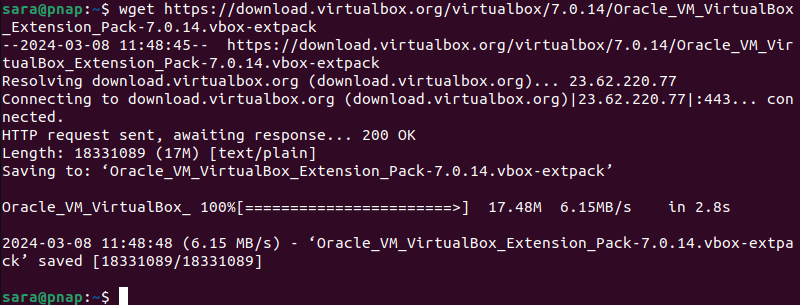
- Download the Extension Pack:
wget <https://download.virtualbox.org/virtualbox/[version-number]/Oracle_VM_VirtualBox_Extension_Pack-[version-number].vbox-extpack>
The current extension pack version on the VirtualBox website is 7.0.14. Therefore, the command is:
wget <https://download.virtualbox.org/virtualbox/7.0.14/Oracle_VM_VirtualBox_Extension_Pack-7.0.14.vbox-extpack>
!https://phoenixnap.com/kb/wp-content/uploads/2024/03/download-extension-pack-terminal-output.png
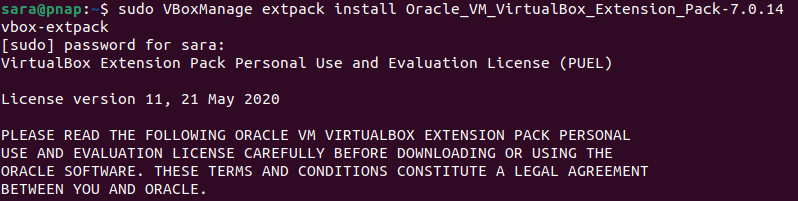
- Import the Extension Pack:
sudo VBoxManage extpack install Oracle_VM_VirtualBox_Extension_Pack-7.0.14.vbox-extpack
!https://phoenixnap.com/kb/wp-content/uploads/2024/03/import-extension-pack-terminal-output.png
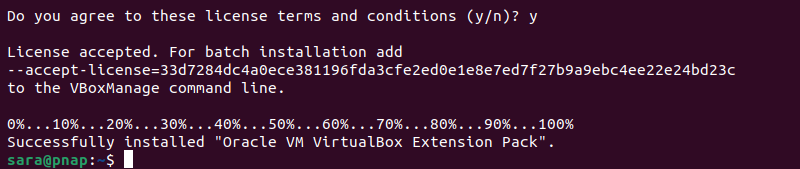
- Confirm the installation and allow the process to complete.
Option 3: Install VirtualBox Using a .deb File
Another way to install VirtualBox on Ubuntu is to use the .deb file. The following steps explain how to do that.
Step 1: Download .deb File
To start the installation, download the .deb file from the VirtualBox website. Take the following steps:
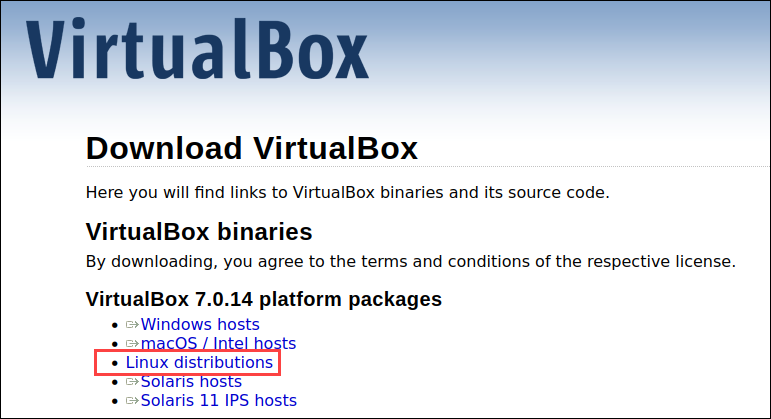
-
Go to the VirtualBox Download page.
-
Click the Linux distributions link.
!https://phoenixnap.com/kb/wp-content/uploads/2024/03/choosing-the-linux-distributions-link.png
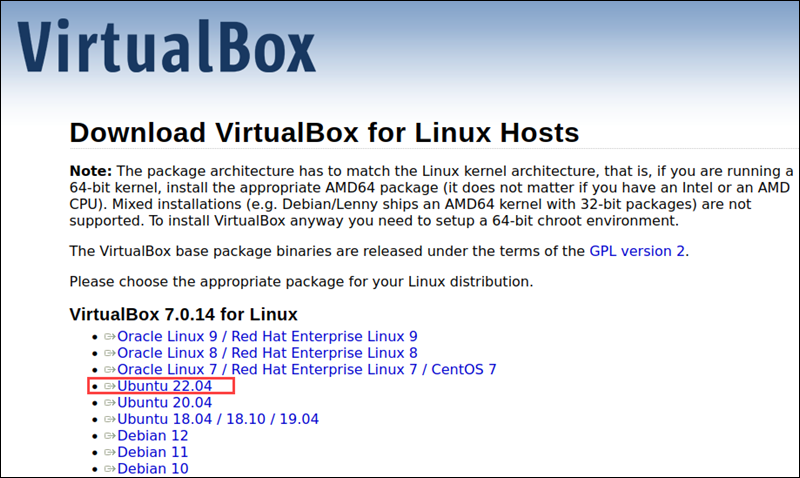
- Find the download link for the current Linux version. In this example, it is Ubuntu 22.04.
!https://phoenixnap.com/kb/wp-content/uploads/2024/03/choosing-linux-version.png
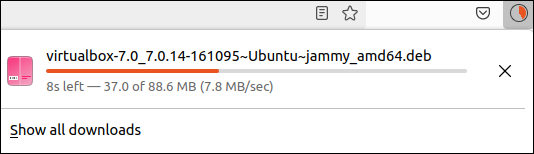
- Click the link and wait for the download to finish.
!https://phoenixnap.com/kb/wp-content/uploads/2024/03/virtualbox-downloading.png
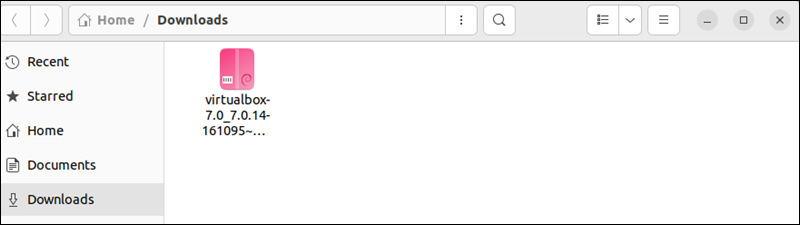
Note where the file is saved, as it is needed in the next step. In this example, the file is downloaded to the Downloads directory.
!https://phoenixnap.com/kb/wp-content/uploads/2024/03/virtualbox-in-downloads-directory.png
Step 2: Install .deb Package
To install the .deb package:
- Navigate to the directory where the package is downloaded. In this case, it is the Downloads directory. Use the cd command:
cd ~/Downloads
!https://phoenixnap.com/kb/wp-content/uploads/2024/03/cd-downloads-terminal-output.png
- Use the dpkg command to install the .deb file from the Downloads directory. The syntax is:
sudo dpkg -i [archive-name].deb
In this example, the command is:
sudo dpkg -i virtualbox-7.0_7.0.14-161095~Ubuntu~jammy_amd64.deb
!https://phoenixnap.com/kb/wp-content/uploads/2024/03/sudo-dpkg-i-terminal-output.png
Step 3: Verify the Installation
Once the installation is completed, verify the installation by running the app:
virtualbox
The command has no output but launches the VirtualBox program.
Note: While this method is simple, it is inconvenient in the long term since it requires a complete reinstall for every update.
Getting Started With VirtualBox
Once installed, VirtualBox allows users to create and manage virtual machines. The software lets users run multiple guest operating systems concurrently on the host machine.
The basic menu items in VirtualBox include:
- File:
- New. Creates a new virtual machine. When selected, VirtualBox opens a wizard that guides users through creating a new virtual machine.
- Add. Adds an existing virtual machine to the VirtualBox Manager.
- Preferences. Configures VirtualBox settings such as general, input, and network settings.
- Machine:
- Start. Starts the selected virtual machine. Once a virtual machine is created or imported into VirtualBox, use this option to boot it up and start using it.
- Pause. This option pauses the selected virtual machine. When users pause a virtual machine, its state is saved, and it temporarily stops executing. This is useful for temporarily suspending a virtual machine without shutting it down.
- Reset. Resets the selected virtual machine.
- Power Off. Powers off the selected virtual machine and saves the state.
- Devices:
- Optical Drives. Manages virtual optical drives attached to the selected virtual machine.
- Shared Clipboard. This option enables or disables the shared clipboard. When enabled, text and files can be copied and pasted between the host operating system and the guest operating system running in the virtual machine.
- Drag and Drop. Enables or disables drag and drop. When enabled, users can drag files and directories between the host operating system and the guest operating system.
These menu items vary depending on the version of VirtualBox and the operating system.
Create Your First Virtual Machine
VirtualBox's primary function is to install and run an operating system within another operating system by creating virtual machines. Take the following steps to create a virtual machine.
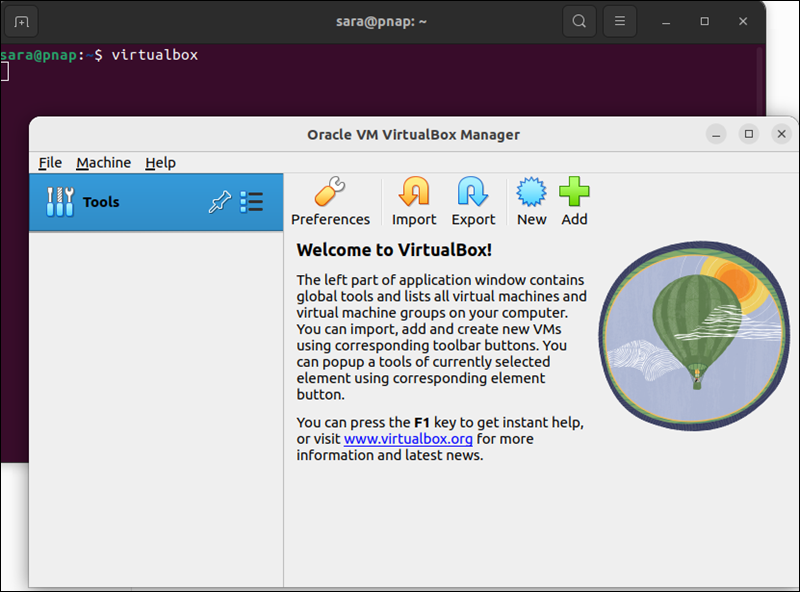
- Launch the VirtualBox interface if not already launched:
virtualbox
!https://phoenixnap.com/kb/wp-content/uploads/2024/03/starting-virtual-box.png
-
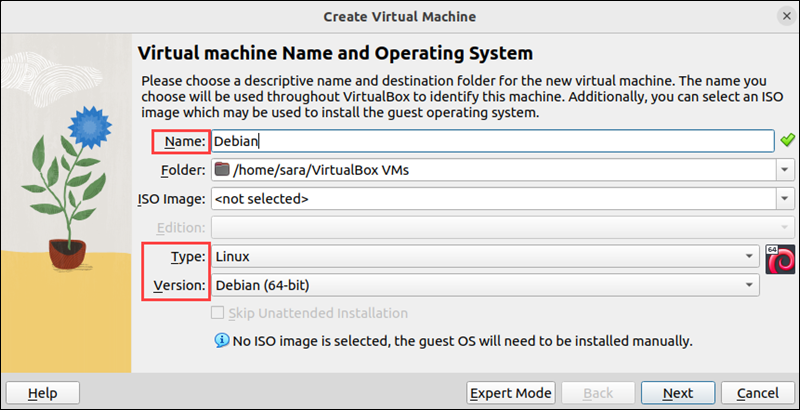
Click the New button to create a new virtual machine. A dialog box opens.
-
Type the OS name. The Type and Version are filled out automatically based on the name. However, change them manually if needed.
!https://phoenixnap.com/kb/wp-content/uploads/2024/03/choose-machine-name.png
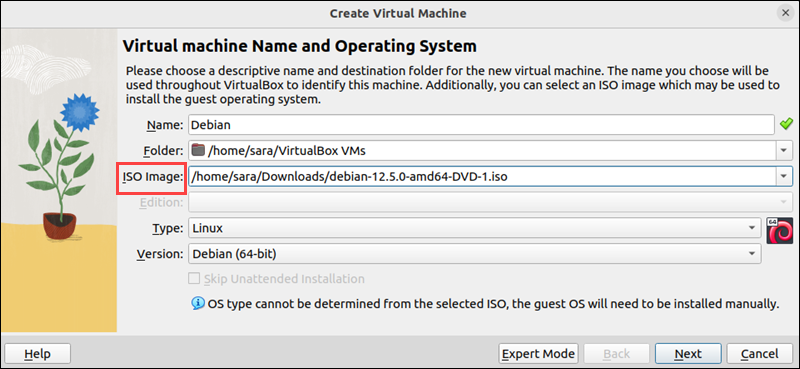
- In the same window, the system prompts you to select an ISO file to boot from. This ISO file can be obtained from the official website of the operating system you wish to install (e.g., Debian, Windows, etc.). Choose the file and click Next.
!https://phoenixnap.com/kb/wp-content/uploads/2024/03/choose-iso-image.png
Note: If you're interested in creating a Rocky or Kali Linux virtual machine, check out our in-depth guides:
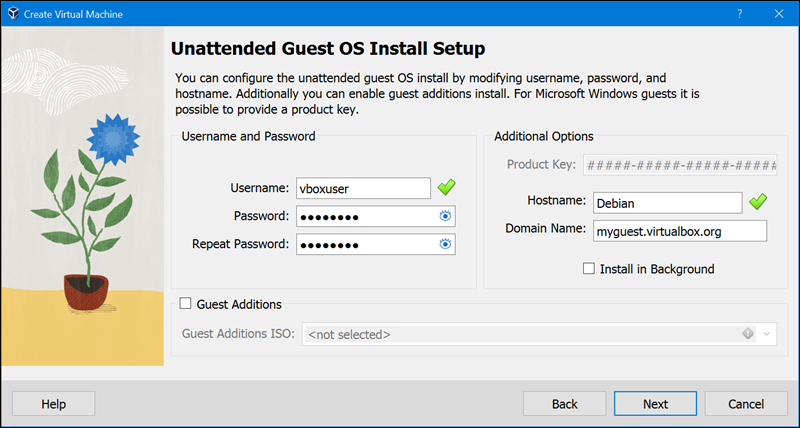
- Choose the username, password, hostname, and domain name. You can install Guest Additions in this step. Guest Additions are drivers and utilities that enhance the performance and usability of guest operating systems.
!https://phoenixnap.com/kb/wp-content/uploads/2024/03/configure-guest-os.png
Once completed, click Next.
- Allocate the base memory and the virtual CPU count. Make sure the sliders stay on the green side to ensure the allocated resources are within the recommended range. This step ensures optimal performance of both the host and guest operating systems.
!https://phoenixnap.com/kb/wp-content/uploads/2024/03/allocate-ram-and-cpu.png
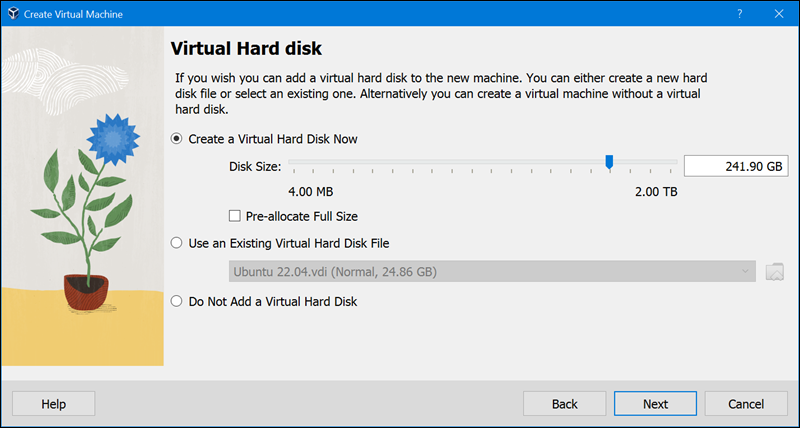
- Mark the Create a Virtual Hard Disk Now checkbox, adjust the Disk Size slider, and click Next.
!https://phoenixnap.com/kb/wp-content/uploads/2024/03/set-disk-size.png
- Check all the settings in the Summary section and click Finish. Once finished, the machine starts installing and configuring;
!https://phoenixnap.com/kb/wp-content/uploads/2024/03/virtual-machine-starts.png
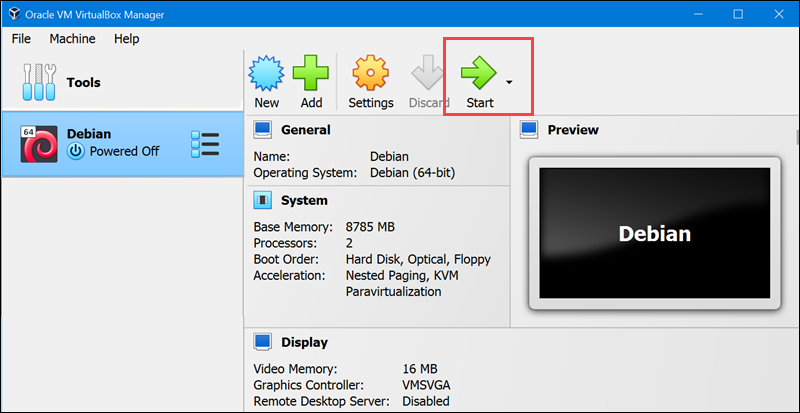
- Once installation completes, a new virtual machine appears in the left column. Select it and click the green arrow Start button.
!https://phoenixnap.com/kb/wp-content/uploads/2024/03/start-virtual-machine.png
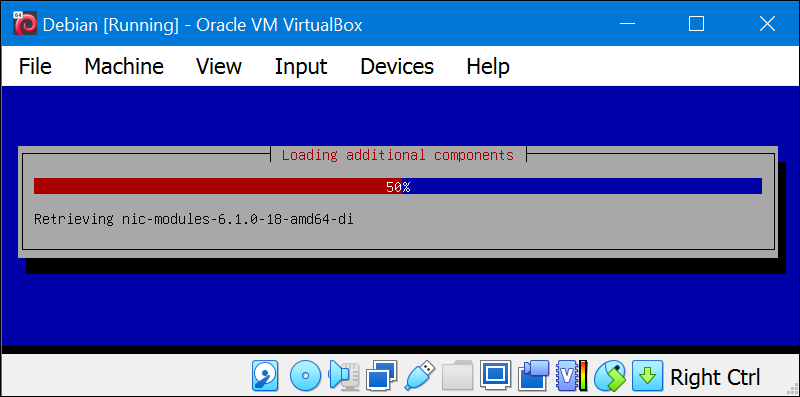
A new window opens and boots up the virtual machine.
Note: VirtualBox also offers pre-built developer VMs that can be downloaded from the Oracle website. These VMs come pre-configured with a development environment, including the necessary tools, libraries, and frameworks to streamline the process of setting up a development environment.
Conclusion
After reading this article, you know three different methods to install VirtualBox on Ubuntu. You also learned how to create a virtual machine on VirtualBox.
Next, read this comparison of Virtualbox vs VMware.
Troubleshoot
As the first step run this command:
sudo modprobe vboxdrv
If it's not helpful run these commands:
sudo apt update
sudo apt install --reinstall linux-headers-$(uname -r) virtualbox-dkms dkms
Then reboot your system and after reboot run this command:
sudo modprobe vboxdrv
And if it doesn't work you must disable Secure Boot in your BIOS/UEFI settings because Secure Boot prevents unsigned modules from being loaded.
Visit Link : Troubleshoot VirtualBox Error : Click Here